This weeks allergy topic brings up an issue that we have never faced and I am wondering do others. Last week I encountered a nightmare with our insurance company and a denied claim to fill a medication that has been a miracle drug for our son. He has been hit hard by the asthma and pneumonia this season and thus drugs have unfortunately become a bigger part of our lives. We have been on a mission to find the right drug(s)to keep his asthma under control. It has been a long road.
Last month we decided to start Singulair after we tried Flovent, Asthmanex and Qvar. It has been an amazing drug for him and he finally was sleeping through the night for the first time in a long time. Our allergist has been so wonderful to give us many samples of all the drugs except the Asthmanex but now it is coming back to bite us in the behind. He gave us several Qvar inhalers of a higher dose and he was doing well so he gave us several inhalers of a lower dose. Then January cold season came on with a vengeance and we did 2 rounds of antibiotics for pneumonia and are actually now doing a 3rd round. So we decided to go with Singulair to get a head start on the allergy season. He gave us one month of that. I then went to fill the Singulair and the insurance company denied our claim because we did not have a filling History at the pharmacy of trying other drugs first due to the samples. SO I just received a letter from the insurance company and if I want them to fill it I have to jump through ridiculous hoops!!
Consequently now that he is off the Singulair he has gone down hill. Despite the fact that we have started now Advair. So much so that we almost had to have him admitted to the Hospital yesterday and as stated earlier we are doing a 3rd round of antibiotics for pneumonia yet again. SO would we rather pay for this drug or pay for a hospital admission? Would we rather pay for this drug or continue to pay for Countless Urgent Care visits and ER Visits? Hmmm? Seems like a no brainer to me. If we filled the Singulair I see the potential that it would be the only drug we would need. So now they have to pay in part for Ventolin, his rescue inhaler. Advair, his longterm inhaler and every other antibiotic we seem to need every other month. Does not seem smart. I will be calling the insurance company most likely later on today. I will post an update of what I learn.
Tuesday, April 5, 2011


Saturday, April 2, 2011
Paper Beads - Part 2
Two weeks ago I gave a brief introduction to paper beads and am extremely sorry I did not get this out last week. I had a major allergic reaction from the walls being open at our hospital and I lost my voice for 4 days!! But back to life and today's topic Paper Beads and how this craft has endless possibilities. Once you purchase a few items the skies the limit and you will find yourself loosing all track of time.
 List of items needed to get started:
- Paper- the smaller the design on the paper often the better.
But this all depends on what you are wanting to do.
It is fun to see what you can get from different styles.
- Some type of sealer- I use regular Mod Podge Gloss-Lustre for a
few coats and then the last coat I use Mod Podge Outdoor
to make it water proof.
- Paper Roller- there are a lot of options out there for rollers. Mine
came with my kit from Klutz and you can order
replacement rollers there. I recently found a wonderful
 crafter named Jenny and she has come up with a
beautiful selection of handmade rollers I will talk
more about her rollers when I get to that part of the instructions!!
- Various Sizes of Paint brushes
- Tooth Picks
- Ruler
- Pencil
- Small piece of styrofoam or foam board - this will be to put your
beads on their tooth picks to dry.
- Old Wet Wash Cloth- I have a wash cloth that is specifically for
 when I make paper beads. Your fingers will get mod podge
on them and it is nice to have something near by to clean
your fingers.
Let's Begin!!
 First you will need some Templates. You can use a card stock to draw out pieces that you will use to trace. There are templates on the web that I have found. Or you can use a ruler and draw out your lines. I often do both. The size and shape of your beads all depends on you and what you like.

I have found there are a few styles I like. First is a little bead and it comes from a strip of paper that is 1/4" wide and approx. 5-7" long. This style is easiest to make with a ruler and you don't have to do a 1/4" you can make it as wide as you want. I also have a bead that is 1/2".


The next shape I am very found of is a long triangular piece. I have a template for this one, as shown above, but once again you can use a ruler as well. You can make any number of different triangle sizes! With my triangle beads I roll the strip right down the center and this is wonderful for showing different colors and designs on the paper. I have also rolled the strip down the side which makes a more cone like shape! I love this one for earrings!


I have not done a circular bead but I have seen them. There are also hour glass shaped templates I have found on the web!
Once you have chosen what type of shape you would like and have cut out your papers you will need your roller!
 The roller: The roller is a tool that has a metal pin piece that you slide the paper between to roll it. I recently found a wonderful artist named Jenn and she decided to come up with her own rollers and OH MY!! They are unbelievably beautiful!! She has several color patterns to choose from and truth be told I like her roller design so much better than my little Klutz roller. Her metal pin design is longer allowing for a wider bead and her handle is longer giving you more to hold onto. The only problem with her Roller? Deciding which one you want!! I LOVE them all!!


 Visit Jenn's Blog at justjenndesignz.blogspot.com
Or you can type paper roller into the Ebay
search engine. BUT you will get a much
 better deal at her blog site. She
includes instructions for making paper
beads with your purchase.
Rolling Your Bead
Now you choose the paper bead you want to make and you slide the paper into the roller.


 List of items needed to get started:
- Paper- the smaller the design on the paper often the better.
But this all depends on what you are wanting to do.
It is fun to see what you can get from different styles.
- Some type of sealer- I use regular Mod Podge Gloss-Lustre for a
few coats and then the last coat I use Mod Podge Outdoor
to make it water proof.
- Paper Roller- there are a lot of options out there for rollers. Mine
came with my kit from Klutz and you can order
replacement rollers there. I recently found a wonderful

beautiful selection of handmade rollers I will talk
more about her rollers when I get to that part of the instructions!!
- Various Sizes of Paint brushes
- Tooth Picks
- Ruler
- Pencil
- Small piece of styrofoam or foam board - this will be to put your
beads on their tooth picks to dry.
- Old Wet Wash Cloth- I have a wash cloth that is specifically for
 when I make paper beads. Your fingers will get mod podge
on them and it is nice to have something near by to clean
your fingers.
Let's Begin!!
 First you will need some Templates. You can use a card stock to draw out pieces that you will use to trace. There are templates on the web that I have found. Or you can use a ruler and draw out your lines. I often do both. The size and shape of your beads all depends on you and what you like.
I have found there are a few styles I like. First is a little bead and it comes from a strip of paper that is 1/4" wide and approx. 5-7" long. This style is easiest to make with a ruler and you don't have to do a 1/4" you can make it as wide as you want. I also have a bead that is 1/2".


The next shape I am very found of is a long triangular piece. I have a template for this one, as shown above, but once again you can use a ruler as well. You can make any number of different triangle sizes! With my triangle beads I roll the strip right down the center and this is wonderful for showing different colors and designs on the paper. I have also rolled the strip down the side which makes a more cone like shape! I love this one for earrings!


I have not done a circular bead but I have seen them. There are also hour glass shaped templates I have found on the web!
Once you have chosen what type of shape you would like and have cut out your papers you will need your roller!
Or you can type paper roller into the Ebay
search engine. BUT you will get a much
better deal at her blog site. She includes instructions for making paper
beads with your purchase.
Rolling Your Bead
Now you choose the paper bead you want to make and you slide the paper into the roller.

You will slide the paper as close to the edge as you can get and then you start rolling. If you are doing a triangular piece as shown in the pic, you decide are you going to roll right down the center or make it cone shaped and then
you roll the edge all to one side. If you are rolling a straight edge such as the 1/4" or 1/2" the goal is to roll as evenly as possible making the edge as straight and even as possible. This will take some practice but you will
get better at it the more you make them.

Time to glue!! Some instructions I have read say to glue the entire strip as you go. I like to glue the last inch or so because it allows you to adjust your bead if it is not even. This is really your preference. You are going to Mod Podge the bead with several coats so it will be secure.

At this point I like to hold the end in place for a few seconds to allow it to start to adhere and make a seal.

Now you will slide your bead off the roller and use a toothpick to open up the middle of your bead.
The roller makes the paper fold in the middle the toothpick makes it hollow in the middle.

Almost done!! Last you will evenly coat the bead with the Mod Podge Luster. I bought a pack of a variety
of size paint brushes and I like to use a brush that matches the size of my bead.


Now you are ready to put your toothpick in styrofoam or a foam board for drying. I like to do 2 coats of
the Mod Podge Luster and then One coat of the Mod Podge Out Door to make it waterproof.
The packaging suggests allowing 15-20 minutes of drying time between each coat and the Out Door will
take a little longer to dry.

Note if you are doing an 1/4" or 1/2" bead you need to coat the ends with at least one coat.

There you have it!! If you really get into making these fun beads, you will develop a process and you can
really crank them out. I made a huge basket full of earrings and bracelets for Christmas Gifts. What I love most about this craft is you can recycle and reuse your old scrapbook paper OR you can get out a white sheet of paper and make your own design.
Let's get rolling!!!! I want to see your beads. I want to hear your ideas!!
Monday, March 21, 2011
Child Allergy Topics-Eczema
Mondays I have decided will be devoted to Allergy Topics because both of our children have allergies to some extent. So mondays will be a time I research and talk about topics I have discussed with other parents and if you have any questions or topics you would like me to explore please send me a message.
Allergies is our life. If you know our family or have met us, you know we face this issue moment to moment at our house and have been doing so since our son was 5 months old. I have decided to explore Eczema as my first topic this week because it was the first sign for both of our children and I know it is the first sign in many children. When our son was born, he had so many newborn skin issues. As an OB nurse I know that newborns have skin issues because they are going from a wet environment to a dry one. Their skin is adjusting. But after time they will start to have that sweet soft smooth baby skin. Our Seth did have that sweet soft smooth baby skin for about 2 weeks. Then I noticed a patch of dry red skin on the middle of his chest. Then it was his cheeks. Then all of his body. When we saw our pediatrician she said it was "just" eczema and just to lotion him up. But that was no comfort as he just got worse and worse. My sister-in-law was dealing with the same thing in her son who was 2 months older. Consequently we were seeing the same pediatrician but they decided to take our nephew to a new provider and he was diagnosed with allergies.
I have met several people who say about their child's eczema "They just have eczema" (and I am primarily writing this because a dear friend is starting to think her daughter may have allergies and you know who you are. I have heard her say this to me.) So I did some research because our allergist has said to me that there is a huge correlation between eczema and allergies but I wanted to know what other parents have been told about eczema.
I have seen multiple chat forums where exactly what I am talking about has occurred. Where a mother was told by her pediatrician that her child "just" had eczema but then saw a allergist and they said there was a huge correlation between the two. I have read and heard time after time that allergists will tell you there is a huge correlation between onset of eczema and allergies. I have also read and seen that this is particularly true with egg, milk and peanut allergies.
This was true for us. We finally saw a pediatrician who knew about allergies and when we finally did our son was extremely sick. He was 4 months old and he had an infection of his skin all over his body. Severe eczema and little crusty areas in the crevices of his elbows, behind his knees, around his ankles and behind his ears. We established care with an allergist and it was determined that Seth was highly allergic to Eggs, Milk, and Peanuts. He was mild to moderately allergic to wheat and Soy. This list has expanded to 25 foods, drugs and environmental things that he is allergic to. Once we started taking the things he was allergic to out of his body (unfortunately because his list was so extensive I had to stop breastfeeding) his skin immediately starting looking better and better. Is it that cut and dry? No. Seth still has flare ups especially when the seasons change. He gets patches behind his knees. But I know how he would look if he ate whatever he wanted. It makes a huge difference.
What does this mean for you and your child? I think if your kiddo has eczema, it is definitely worth the testing. Because the more a child is exposed to what they are allergic to the worse the reaction is going to get. If you get testing and find out that it is "just" eczema, and no they don't have allergies, Yeah!! But if they do, then this means you can help them.
Allergies is our life. If you know our family or have met us, you know we face this issue moment to moment at our house and have been doing so since our son was 5 months old. I have decided to explore Eczema as my first topic this week because it was the first sign for both of our children and I know it is the first sign in many children. When our son was born, he had so many newborn skin issues. As an OB nurse I know that newborns have skin issues because they are going from a wet environment to a dry one. Their skin is adjusting. But after time they will start to have that sweet soft smooth baby skin. Our Seth did have that sweet soft smooth baby skin for about 2 weeks. Then I noticed a patch of dry red skin on the middle of his chest. Then it was his cheeks. Then all of his body. When we saw our pediatrician she said it was "just" eczema and just to lotion him up. But that was no comfort as he just got worse and worse. My sister-in-law was dealing with the same thing in her son who was 2 months older. Consequently we were seeing the same pediatrician but they decided to take our nephew to a new provider and he was diagnosed with allergies.
I have met several people who say about their child's eczema "They just have eczema" (and I am primarily writing this because a dear friend is starting to think her daughter may have allergies and you know who you are. I have heard her say this to me.) So I did some research because our allergist has said to me that there is a huge correlation between eczema and allergies but I wanted to know what other parents have been told about eczema.
I have seen multiple chat forums where exactly what I am talking about has occurred. Where a mother was told by her pediatrician that her child "just" had eczema but then saw a allergist and they said there was a huge correlation between the two. I have read and heard time after time that allergists will tell you there is a huge correlation between onset of eczema and allergies. I have also read and seen that this is particularly true with egg, milk and peanut allergies.
This was true for us. We finally saw a pediatrician who knew about allergies and when we finally did our son was extremely sick. He was 4 months old and he had an infection of his skin all over his body. Severe eczema and little crusty areas in the crevices of his elbows, behind his knees, around his ankles and behind his ears. We established care with an allergist and it was determined that Seth was highly allergic to Eggs, Milk, and Peanuts. He was mild to moderately allergic to wheat and Soy. This list has expanded to 25 foods, drugs and environmental things that he is allergic to. Once we started taking the things he was allergic to out of his body (unfortunately because his list was so extensive I had to stop breastfeeding) his skin immediately starting looking better and better. Is it that cut and dry? No. Seth still has flare ups especially when the seasons change. He gets patches behind his knees. But I know how he would look if he ate whatever he wanted. It makes a huge difference.
What does this mean for you and your child? I think if your kiddo has eczema, it is definitely worth the testing. Because the more a child is exposed to what they are allergic to the worse the reaction is going to get. If you get testing and find out that it is "just" eczema, and no they don't have allergies, Yeah!! But if they do, then this means you can help them.
Saturday, March 19, 2011
Paper Beads Part 1
IT WAS APPROXIMATELY 6 MONTHS AGO THAT I RECEIVED MY PAPER BEADS KIT IN THE MAIL THAT I HAD ORDERED FROM KLUTZ.COM. YES THE PACKAGING STATES FOR AGES 8 AND UP. I WOULD BE THE AND UP. I AM IN LOVE WITH KLUTZ. SO MUCH THAT I HAVE JUST DECIDED AT SOME POINT I WILL DO A BLOG ABOUT THEM. FOR NOW BACK TO THE PAPER BEADS. THE KIT WAS LOADED WITH 22 DIFFERENT COLORS AND DESIGNS!! I WAS LIKE A KID IN A CANDY SHOP!!


ONCE I GOT CREATING IT BECAME QUITE ADDICTIVE FOR ME. I WAS TALKING TO A SALES ASSOCIATE AT THE CRAFT STORE AND SHE FELT IT WAS TOO TIME CONSUMING THE AMOUNT OF WORK IT TOOK. BUT I FIND IT TO CALM ME AND BE QUITE ENJOYABLE.
ONE THING YOU SHOULD KNOW ABOUT ME AND ALWAYS KEEP THIS IN MIND, IS I JUST CAN'T SEEM TO FOLLOW A RECIPE, PATTERN, INSTRUCTIONS, ETC TO THE LETTER. I HAVE TO MAKE IT MY OWN AND AS SOON AS I SAW THIS BOOK MY MIND STARTED RACING. I HAVE ENOUGH PAPER OF MY OWN TO CHOKE A HORSE AND I WAS PSYCHED!! WHILE I DID USE THE MAJORITY OF THE PAPER THAT CAME IN THE KIT (FOR CHRISTMAS GIFTS), I IMMEDIATELY STARTED MAKING MY OWN BEADS OUT OF MY OWN PAPER. THE KIT INSTRUCTIONS WERE BASIC SO OF COURSE I HAD TO BUMP IT UP A NOTCH.

ONCE I GOT CREATING IT BECAME QUITE ADDICTIVE FOR ME. I WAS TALKING TO A SALES ASSOCIATE AT THE CRAFT STORE AND SHE FELT IT WAS TOO TIME CONSUMING THE AMOUNT OF WORK IT TOOK. BUT I FIND IT TO CALM ME AND BE QUITE ENJOYABLE.
WHEN I SAY BUMP IT UP I MEAN PRETTY MUCH EVERY ASPECT. FIRST, I STARTED TO RESEARCH EVERY WATER BASED SEALER TO FIND THE BEST ONE. IT BECAME IMMEDIATELY APPARENT THAT THE KIT CAME WITH SOMETHING SIMILAR TO MOD PODGE. SO I BOUGHT A HUGE BOTTLE OF MOD PODGE BUT THE KIND THAT WOULD MAKE MY BEADS GLOSSY. BUT THEN MULTIPLE PEOPLE BROUGHT TO MY ATTENTION THAT MY BEADS WERE NOT WATER PROOF!! SO I DID SOME MORE RESEARCH AND LOW AND BEHOLD MOD PODGE MAKES A WATERPROOF SEALER!!
THE KLUTZ KIT CAME WITH LARGER GLASS BEADS TO USE IN YOUR BRACELETS AND NECKLACES. WHILE I DO HAVE THE SAME EXACT SIZE BEADS AND I LOVE TO USE THE LARGER BEADS BECAUSE IT MAKES THE BRACELET COME TOGETHER FASTER, I DECIDED TO GET OUT THE SEED BEADS. I FOUND BOTH PRODUCE A GREAT LOOK.
THE KLUTZ KIT CAME WITH A FAIRLY LARGE SIZE OF STRETCHY CORD BUT YOUR LOCAL CRAFT STORE WILL HAVE SO MANY KINDS AND GAUGES OF STRETCH CORD YOU WILL HAVE A HARD TIME DECIDING. I WENT WITH A LARGER GAUGE FOR THE BIGGER GLASS BEADS AND A SMALLER GAUGE FOR THE SEED BEADS.
THEN IT OCCURRED TO ME THAT I COULD MAKE EARRINGS!! LIKE I SAID WHEN I GET GOING, I GO. SO I BOUGHT EARRING HOOPS THAT ATTACH TO HEADPINS. (YOU NEED JEWELRY MAKING TOOLS TO MAKE THE EARRINGS. I WILL COVER THIS IN ANOTHER POST). AND AFTER WATCHING A FEW YOU TUBE VIDEOS AND A LOT OF PRACTICE I WAS ABLE TO CREATE SOME CUTE EARRINGS!
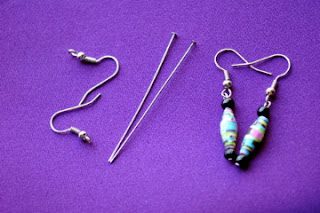 COULD I STOP WITH BRACELETS AND EARRINGS? OF COURSE NOT. SO I DECIDED TO CREATE SOME RINGS AS WELL AND THEY ARE THE EASIEST AND FASTEST TO MAKE! SO MANY OPTIONS!!


IN MY FUTURE BLOGS I WILL GUIDE YOU THROUGH THE PROCESS OF MAKING PAPER BEADS AND ALL THE SUPPLIES AND TOOLS YOU WILL NEED. THE SKIES THE LIMIT WITH THIS FUN AND EASY CRAFT!!
THE KLUTZ KIT CAME WITH LARGER GLASS BEADS TO USE IN YOUR BRACELETS AND NECKLACES. WHILE I DO HAVE THE SAME EXACT SIZE BEADS AND I LOVE TO USE THE LARGER BEADS BECAUSE IT MAKES THE BRACELET COME TOGETHER FASTER, I DECIDED TO GET OUT THE SEED BEADS. I FOUND BOTH PRODUCE A GREAT LOOK.
THE KLUTZ KIT CAME WITH A FAIRLY LARGE SIZE OF STRETCHY CORD BUT YOUR LOCAL CRAFT STORE WILL HAVE SO MANY KINDS AND GAUGES OF STRETCH CORD YOU WILL HAVE A HARD TIME DECIDING. I WENT WITH A LARGER GAUGE FOR THE BIGGER GLASS BEADS AND A SMALLER GAUGE FOR THE SEED BEADS.
THEN IT OCCURRED TO ME THAT I COULD MAKE EARRINGS!! LIKE I SAID WHEN I GET GOING, I GO. SO I BOUGHT EARRING HOOPS THAT ATTACH TO HEADPINS. (YOU NEED JEWELRY MAKING TOOLS TO MAKE THE EARRINGS. I WILL COVER THIS IN ANOTHER POST). AND AFTER WATCHING A FEW YOU TUBE VIDEOS AND A LOT OF PRACTICE I WAS ABLE TO CREATE SOME CUTE EARRINGS!


IN MY FUTURE BLOGS I WILL GUIDE YOU THROUGH THE PROCESS OF MAKING PAPER BEADS AND ALL THE SUPPLIES AND TOOLS YOU WILL NEED. THE SKIES THE LIMIT WITH THIS FUN AND EASY CRAFT!!
Subscribe to:
Posts (Atom)